📰 Fed News (2026)

DEWALT DCF850
Power & Precision in your hands.
Market Live
Bitcoin (BTC)
Loading...

Total Visitors
5473
Recent Activity
@puk
04 Oct 2025 • 05:36
วิธีจัดการ กรณีต้องการเร่ง confirm (RBF) bitcoin-cli bumpfee 0123c92d0556ee428170cdb032382a0db7bea6f45baa2c0c243c6953a219cb73 Bitcoin Core จะสร้าง transaction ใหม่ที่ ค่าธรรมเนียมสูงกว่า เพื่อให้ miners confirm เร็วขึ้น กรณีต้องการยกเลิก หาก transaction ค้างนานเกินไป สามารถใช้: bitcoin-cli abandontransaction 0123c92d0556ee428170cdb032382a0db7bea6f45baa2c0c243c6953a21
@puk
04 Oct 2025 • 03:45
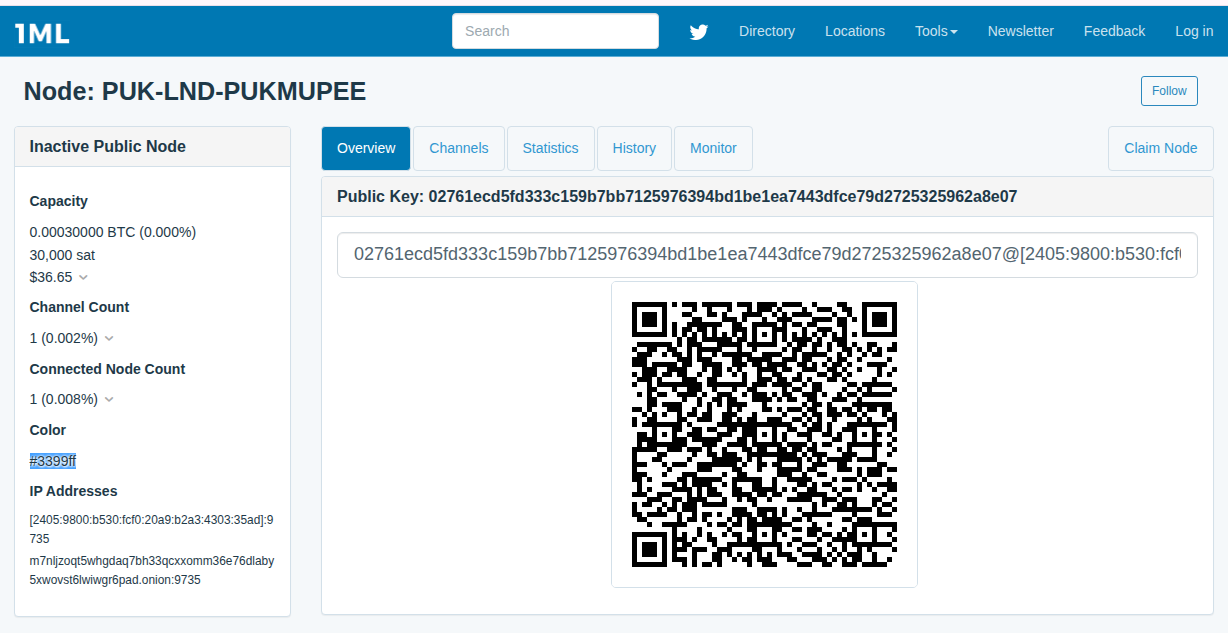
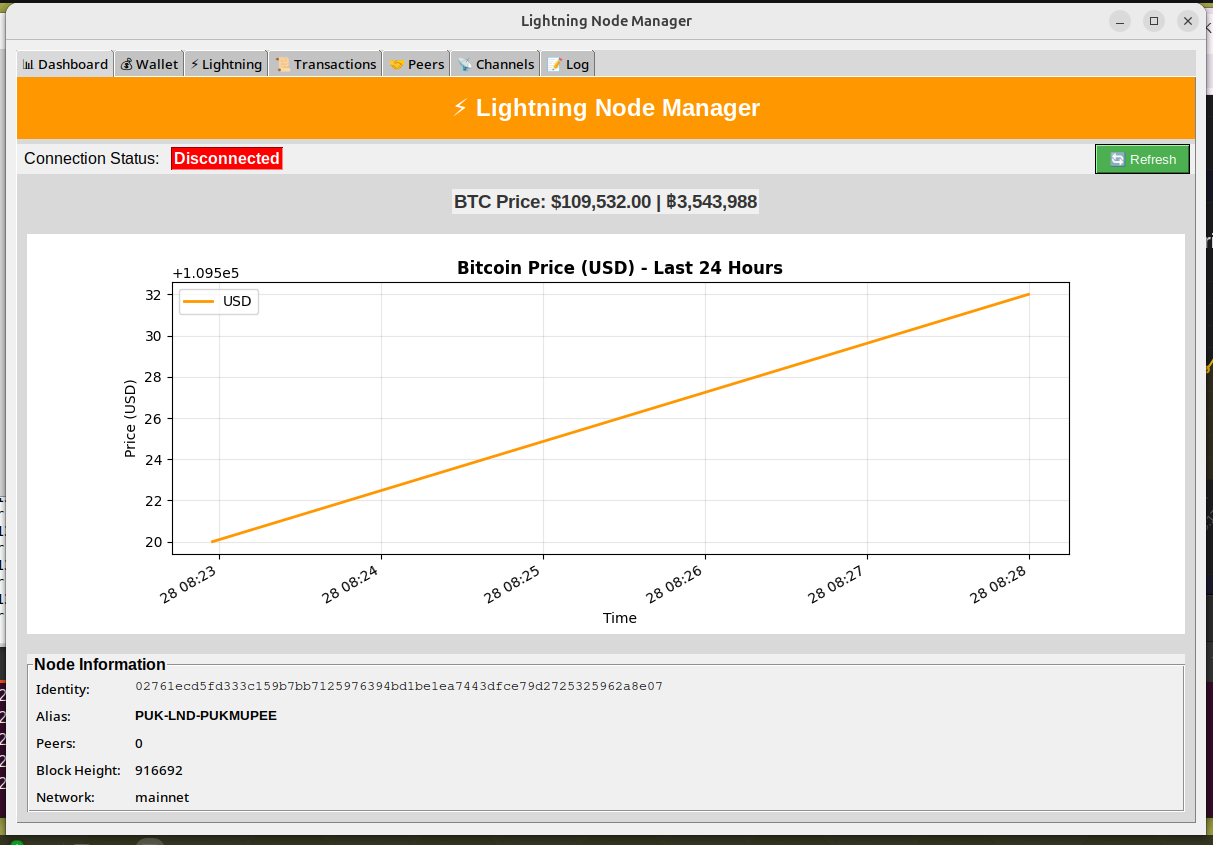
https://1ml.com/node/02761ecd5fd333c159b7bb7125976394bd1be1ea7443dfce79d2725325962a8e07
@puk
04 Oct 2025 • 03:44
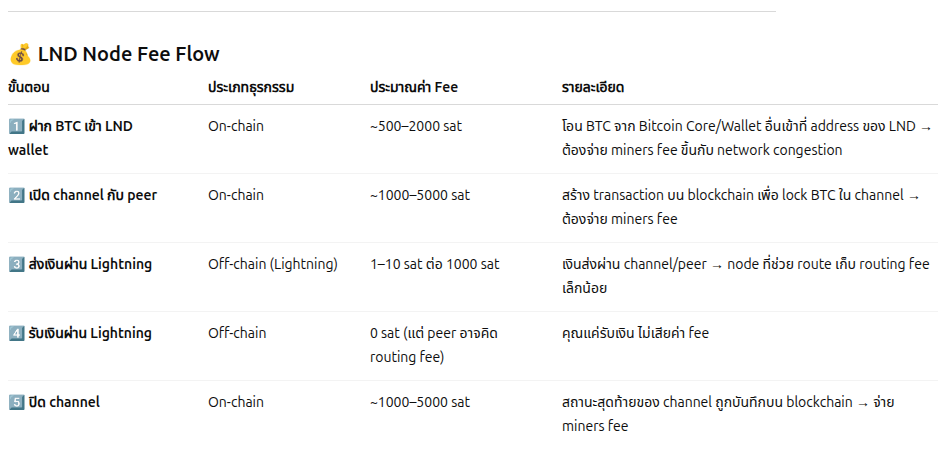
workflow ตั้งแต่ฝาก BTC → เปิด channel → ส่ง Lightning → ปิด channel พร้อมประมาณ ค่าธรรมเนียมจริง (สมมติ) ให้เห็นชัด ๆ 🔹 ตัวอย่าง Scenario ฝาก BTC 0.01 BTC → fee ~0.00002 BTC (2000 sat) เปิด channel 0.01 BTC → fee ~0.00003 BTC (3000 sat) ส่ง Lightning 0.001 BTC → routing fee ~1–10 sat ปิด channel 0.01 BTC → fee ~0.00003 BTC (3000 sat) รวมค่าใช้จ่าย on-chain: ~0.00008 BTC (~8$ ถ้า BTC = $100k) ค่าธรรมเนียม Lightning: น้อยมาก (ไม่ถึง $0.01 ต่อ transaction)
@puk
04 Oct 2025 • 03:41
สรุปให้ชัด ๆ กันเลยว่า ถ้าคุณ เปิดโหนด LND (self-hosted) จะมีค่าใช้จ่ายแบบไหนบ้าง 🎯 1️⃣ ค่าธรรมเนียม On-chain (บันทึกลง Bitcoin blockchain) ทุกครั้งที่ทำ ธุรกรรมบน chain ต้องเสีย fee ให้ miners: กิจกรรม Fee ที่เกิดขึ้น อธิบาย เปิด channel กับ peer ใช้ BTC เป็น fee ให้ miners ต้องสร้าง transaction บน Bitcoin blockchain เพื่อ lock BTC ใน channel ปิด channel ใช้ BTC เป็น fee ให้ miners สถานะสุดท้ายของ channel ถูกบันทึกลง blockchain ฝาก/ถอน BTC จาก wallet ของคุณ ใช้ BTC เป็น fee ให้ miners เช่น โอน BTC เข้า LND หรือถอนออกไปที่ wallet อื่น 💡 สรุป: ทุกครั้งที่เกี่ยวข้องกับ on-chain transaction → ต้องเสีย fee 2️⃣ ค่าธรรมเนียม Off-chain (Lightning Network) เมื่อ BTC อยู่ใน channel แล้ว การจ่ายเงินผ่าน Lightning Network: กิจกรรม Fee ที่เกิดขึ้น อธิบาย จ่ายเงินให้ peer อื่น Routing fee (satoshis) Node ที่ช่วย route จะเก็บ fee เล็กน้อย รับเงินจาก peer อื่น ไม่มีค่าธรรมเนียม แต่ peer อาจตั้ง fee สำหรับ routing ต่อ 💡 สรุป: การจ่ายเงินผ่าน Lightning Network เร็วและถูกกว่า on-chain เพราะไม่บันทึกลง blockchain ทุกครั้ง 3️⃣ ค่าธรรมเนียมอื่น ๆ ค่าดูแล/เช่า server (ถ้าใช้ VPS) ค่าไฟ ถ้าใช้โหนดบ้านตัวเอง ค่าซิงก์ blockchain (พื้นที่ storage, bandwidth) 4️⃣ ภาพรวม [Bitcoin Wallet] --(on-chain fee)--> [LND wallet] --(off-chain fee)--> [Lightning payments] เปิด/ปิด channel = on-chain fee ส่ง Lightning payments = routing fee ฝาก/ถอน BTC = on-chain fee ถ้าคุณต้องการ ผมสามารถทำ ตารางตัวอย่างค่าใช้จ่ายจริง + workflow ตั้งแต่ฝาก BTC → เปิด channel → ส่ง Lightning → ปิด channel ให้เห็นตัวเลขชัด ๆ ⚡
@puk
03 Oct 2025 • 14:41
Proj-Pool-mining
@puk
03 Oct 2025 • 13:17
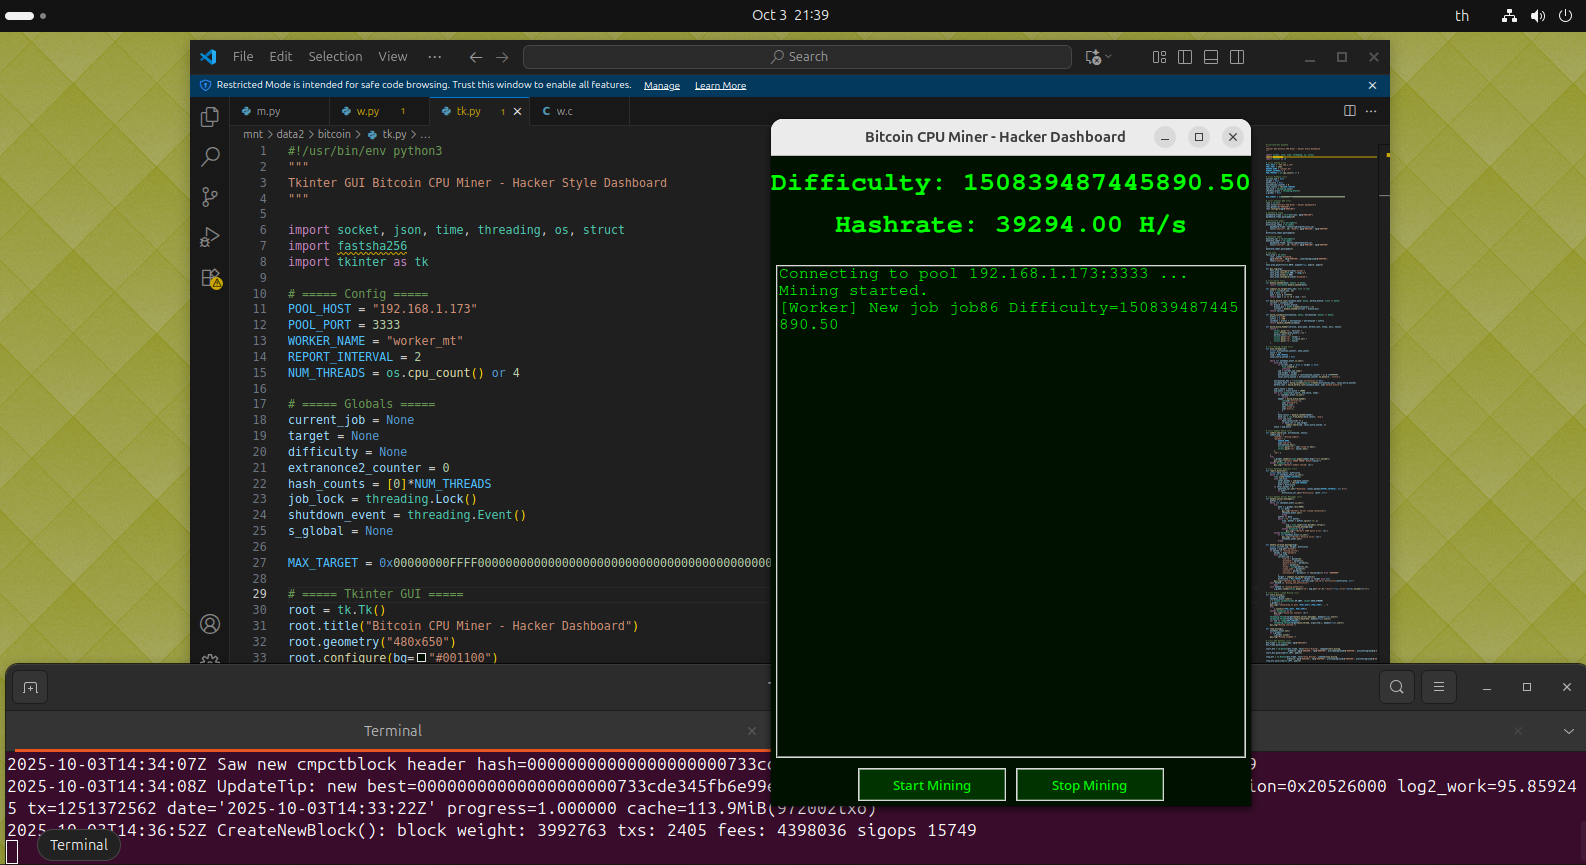
#!/usr/bin/env python3 """ Realistic Stratum Worker for Bitcoin Mining (CPU) - Connects to Stratum pool - Handles mining.notify, mining.set_difficulty, mining.authorize - Builds coinbase with extranonce1/extranonce2 - Mines block header - Submits valid shares - Reports per-thread hashrate """ import socket, json, time, threading, os, struct import fastsha256 # ===== Config ===== POOL_HOST = "192.168.1.173" POOL_PORT = 3333 WORKER_NAME = "worker_mt" REPORT_INTERVAL = 2 # seconds NUM_THREADS = os.cpu_count() or 4 # ===== Globals ===== current_job = None # {job_id, prevhash, merkle_branch, bits, version, extranonce1, clean_jobs} target = None # integer target extranonce2_counter = 0 # 32-bit counter hash_counts = [0] * NUM_THREADS job_lock = threading.Lock() shutdown_event = threading.Event() s_global = None # ===== Utils ===== def double_sha256(data: bytes) -> bytes: return fastsha256.double_sha256(data) def compact_to_target(bits_hex: str) -> int: bits = int(bits_hex, 16) exp = bits >> 24 mant = bits & 0xFFFFFF return mant * (1 << (8 * (exp - 3))) def build_merkle_root(coinbase_hash: bytes, merkle_branch: list) -> bytes: current = coinbase_hash for branch in merkle_branch: branch_bin = bytes.fromhex(branch)[::-1] current = double_sha256(current + branch_bin) return current def build_coinbase(extranonce1: bytes, extranonce2: bytes) -> bytes: # Simplified coinbase: prefix + extranonce1 + extranonce2 + suffix prefix = b'\x03' # OP_PUSHDATA minimal suffix = b'\x00' # OP_RETURN or padding coinbase = prefix + extranonce1 + extranonce2 + suffix return double_sha256(coinbase) def build_block_header(version, prev_hash, merkle_root, ntime, bits, nonce): return ( struct.pack("<I", version) + bytes.fromhex(prev_hash)[::-1] + merkle_root[::-1] + struct.pack("<I", ntime) + struct.pack("<I", int(bits, 16)) + struct.pack("<I", nonce) ) # ===== Mining Thread ===== def mine_thread(tid): global extranonce2_counter, hash_counts nonce = tid step = NUM_THREADS local_extra_nonce2 = None while not shutdown_event.is_set(): with job_lock: if current_job is None or target is None: time.sleep(0.1) continue job = current_job.copy() job_target = target # generate extra_nonce2 extranonce2_counter = (extranonce2_counter + 1) & 0xFFFFFFFF local_extra_nonce2 = extranonce2_counter.to_bytes(4, 'little') extranonce1_hex = f"{int(job['extranonce1']):08x}" # แปลงเป็น 4-byte hex string coinbase_hash = build_coinbase(bytes.fromhex(extranonce1_hex), local_extra_nonce2) merkle_root = build_merkle_root(coinbase_hash, job['merkle_branch']) start_nonce = nonce end_nonce = start_nonce + 10000 # batch for n in range(start_nonce, end_nonce, step): if shutdown_event.is_set(): return header = build_block_header( int(job['version']), job['prevhash'], merkle_root, job['ntime'], job['bits'], n ) hash_result = double_sha256(header) hash_int = int.from_bytes(hash_result, 'big') with job_lock: hash_counts[tid] += 1 if hash_int <= job_target: submit_share(job, local_extra_nonce2, n) nonce = end_nonce # ===== Submit share ===== def submit_share(job, extranonce2, nonce): submit_msg = { "method": "mining.submit", "params": [ WORKER_NAME, job['job_id'], extranonce2.hex(), struct.pack("<I", job['ntime']).hex(), struct.pack("<I", nonce).hex() ], "id": 1 } try: s_global.sendall((json.dumps(submit_msg) + "\n").encode()) print(f"[Worker] SHARE FOUND! Nonce={nonce}") except Exception as e: print(f"[Worker] Submit failed: {e}") # ===== Hashrate Reporter ===== def report_hashrate(): global hash_counts while not shutdown_event.is_set(): time.sleep(REPORT_INTERVAL) with job_lock: total_hashes = sum(hash_counts) hash_counts = [0]*NUM_THREADS if total_hashes > 0: print(f"[Hashrate] {total_hashes/REPORT_INTERVAL:.2f} H/s (~{total_hashes/REPORT_INTERVAL/1e6:.2f} MH/s)") # ===== Handle Server Messages ===== def handle_server_messages(): buffer = b"" while not shutdown_event.is_set(): try: data = s_global.recv(4096) if not data: print("[Worker] Server closed connection") shutdown_event.set() break buffer += data while b'\n' in buffer: line, buffer = buffer.split(b'\n', 1) try: msg = json.loads(line.decode().strip()) handle_stratum_message(msg) except Exception as e: print(f"[Worker] JSON parse error: {e}") except Exception as e: if not shutdown_event.is_set(): print(f"[Worker] Receive error: {e}") shutdown_event.set() break def handle_stratum_message(msg): global current_job, target method = msg.get("method") if method == "mining.notify": params = msg["params"] with job_lock: current_job = { 'job_id': params[0], 'prevhash': params[1], 'merkle_branch': params[2], 'bits': params[3], 'ntime': int(params[4], 16), 'clean_jobs': params[5], 'version': params[6], 'extranonce1': params[7] if len(params) > 7 else "00000000" } target = compact_to_target(params[3]) print(f"[Worker] New job {current_job['job_id']} (target {hex(target)})") elif method == "mining.set_difficulty": # optional pass elif method == "mining.authorize": # reply OK s_global.sendall(json.dumps({"id": msg.get("id",0),"result":True,"error":None}).encode() + b"\n") # ===== Main ===== def main(): global s_global s = socket.socket(socket.AF_INET, socket.SOCK_STREAM) s_global = s print(f"[{WORKER_NAME}] Connecting to pool {POOL_HOST}:{POOL_PORT} ...") try: s.connect((POOL_HOST, POOL_PORT)) except Exception as e: print(f"[Worker] Could not connect: {e}") return threading.Thread(target=handle_server_messages, daemon=True).start() threading.Thread(target=report_hashrate, daemon=True).start() for tid in range(NUM_THREADS): threading.Thread(target=mine_thread, args=(tid,), daemon=True).start() try: while not shutdown_event.is_set(): time.sleep(1) except KeyboardInterrupt: print("\n[Worker] Shutting down...") finally: shutdown_event.set() s.close() if __name__ == "__main__": main()
@puk
03 Oct 2025 • 06:01
#!/usr/bin/env python3 """ Stratum Worker Client (Python) - Connects to pool server - Sends nonce updates - Simulates mining CPU/ASIC """ import socket, json, time, threading, random POOL_HOST = "IP_POOL_SERVER" # เปลี่ยนเป็น IP ของเครื่อง pool POOL_PORT = 3333 WORKER_NAME = "worker1" HASHES_PER_SECOND = 20 # ปรับตามความแรงของเครื่อง def send_nonce(conn, nonce): data = json.dumps({"worker": WORKER_NAME, "nonce": nonce}) conn.sendall(data.encode() + b'\n') def miner_loop(conn): nonce = 0 while True: nonce += 1 send_nonce(conn, nonce) time.sleep(1 / HASHES_PER_SECOND) def main(): with socket.socket(socket.AF_INET, socket.SOCK_STREAM) as s: print(f"[{WORKER_NAME}] Connecting to pool {POOL_HOST}:{POOL_PORT} ...") s.connect((POOL_HOST, POOL_PORT)) threading.Thread(target=miner_loop, args=(s,), daemon=True).start() while True: try: data = s.recv(1024) if not data: break # สามารถรับข้อความจาก pool ได้ เช่น งานใหม่หรือ template print(f"[{WORKER_NAME}] Received: {data.decode().strip()}") except Exception as e: print(f"[{WORKER_NAME}] Connection error: {e}") break if __name__ == "__main__": main()
@puk
02 Oct 2025 • 15:04
roadmap ของเวอร์ชันใหม่ก่อน จากนั้นจัดโค้ดให้ครบถ้วนสำหรับ SegWit, correct target, optimized hashing, submitblock บน mainnet/testnet/regtest 🚀 Roadmap เวอร์ชันใหม่ Coinbase + Witness Commitment คำนวณ witness merkle root ของ txs เพิ่ม output 0-value + scriptPubKey = OP_RETURN 0x24 <witness_merkle_root> ตาม BIP141 ทำให้ block ถูกต้องสำหรับ SegWit Target bits → Integer แปลง bits (compact) → target (256-bit int) ใช้เปรียบเทียบกับ header hash แบบ integer Optimized Hashing ใช้ hashlib.sha256 (C implementation) หรือ subprocess openssl dgst -sha256 -binary (optional) แทน double-python hashing → เร็วขึ้นหลายเท่า submitblock ใช้งานจริง ส่ง block hex แบบถูกต้อง → RPC submitblock ตรวจสอบ response → success/failure ทดสอบ เริ่มจาก regtest → สร้าง block ทดสอบได้ทันที แล้วขยายไป testnet/mainnet
@puk
01 Oct 2025 • 01:32
python bot_dashboard_full.py --mode backtest --strategy sma_crossover --start_date 2024-01-01 --end_date 2025-01-01 python bot_dashboard_full.py --mode realtime --strategy mean_reversion
@puk
30 Sep 2025 • 15:42
ทดสอบไล่เปิด Position ได้ไม่จำกัด ตราบใดที่ยังมี PUK เหลือเฟือ
@puk
30 Sep 2025 • 15:18
การปรับเปลี่ยนและเพิ่มฟีเจอร์ใหม่ ๆ เข้าไปในโค้ดเกม Card Battle RPG ของคุณอย่างครอบคลุม ดังนี้: สรุปการปรับเปลี่ยนหลัก (Major Changes) ระบบหลัก รายละเอียดการปรับปรุง โครงสร้างข้อมูล รวม free_cards เข้าไปใน inventory อย่างถาวร เพื่อลดความซ้ำซ้อนในการจัดการการ์ด ระบบ HP รวม เปลี่ยนระบบต่อสู้ให้เป็นการ์ดต่อการ์ด (Card vs Card) แต่มี Player HP และ Enemy HP รวมของทั้งทีม เมื่อการ์ดถูกกำจัด HP รวม ของฝั่งนั้นจะลดลงตามค่า HP ที่เหลือของการ์ดที่ถูกทำลาย (Overflow Damage) ทำให้การกำจัดเป็นเป้าหมายสำคัญกว่าแค่การลด HP การสเกลความยาก ปรับสูตรการสเกลความแข็งแกร่งของศัตรูให้สูงขึ้นอย่างชัดเจน (+30% ต่อระดับ) เพื่อให้เกมมีความท้าทายมากขึ้นในทุก ๆ รอบ (Scale Factor=1+(Battle Count×0.30)) UI/UX ปรับปรุงการแสดงผล HP Bar, Text, และเพิ่มพื้นหลังภาพ (ถ้ามีไฟล์) เพื่อให้ดูทันสมัยและน่าสนใจยิ่งขึ้น การจัดการเสียง เพิ่มฟังก์ชันการเล่น Background Music (BGM) สำหรับแต่ละหน้าจอ (Title, Battle, Shop, Deck Select) และเพิ่ม Sound Effects (SFX) สำหรับ Gacha, Attack, Heal, Victory, และ Defeat ส่งออกไปยังชีต การเพิ่มฟีเจอร์เชิงลึก (In-Depth Features Added) 1. ระบบ Card Abilities และ Status Effects การ์ดบางใบจะมีการติดตั้งความสามารถพิเศษ (Ability) ที่จะทำงานก่อนการโจมตี (ยกเว้น Heal ที่ทำงานกับตัวเอง) และสามารถใช้ได้ทุกเทิร์น: Ability Effect Status Effect ที่เกี่ยวข้อง Heal ฟื้นฟู HP ให้ตัวเอง 25% ของ Max HP N/A Block ได้รับสถานะ Block: ลดความเสียหายที่จะได้รับในเทิร์นหน้าลง 50% block_active Poison ใส่สถานะ Poison Stack ให้การ์ดศัตรู poison_stacks (ทำ Damage Over Time - DoT) Stun ใส่สถานะ Stun ให้การ์ดศัตรู is_stunned (ไม่สามารถโจมตีได้ในเทิร์นหน้า) Crit Boost มีโอกาส 50% ที่จะเพิ่มพลังโจมตีเป็นสองเท่าสำหรับการโจมตีในเทิร์นนั้น N/A ส่งออกไปยังชีต 2. ระบบ DoT (Damage over Time) การ์ดที่มีสถานะ Poison จะได้รับความเสียหายต่อเนื่อง (Damage over Time) เท่ากับ 5% ของ Max HP ต่อ Poison Stack ในช่วงเริ่มต้นเทิร์นของตัวเอง 3. ระบบ Upgrade และ Evolution (Shop) ฟีเจอร์ รายละเอียด ค่าใช้จ่าย/เงื่อนไข Card Upgrade เพิ่มระดับการ์ด level (สูงสุด 10) และเพิ่มโบนัส power_boost และ res_boost แบบสุ่ม 10,000,000 ต่อครั้ง Card Evolution การ์ดบางใบสามารถเปลี่ยนไปเป็นการ์ด ID ใหม่ที่สูงกว่าได้ (เช่น Card ID 99 → Card ID 100) ต้องมี Level สูงสุด (10/10) และใช้เงิน 100,000,000 Gacha/Pack เพิ่มระบบ Buy Normal Pack (Common/Rare) และ Buy Special Pack (Epic/Legendary/Mythic) พร้อมระบบ Refund เมื่อได้การ์ดซ้ำ Normal: 2,000,000, Special: 10,000,000 ส่งออกไปยังชีต โหมดและหน้าจอใหม่ หน้าจอ รายละเอียด Deck Select Screen หน้าจอเฉพาะสำหรับการจัดการ Inventory และการจัด Deck (จำกัด 5 ใบ) Shop Screen หน้าจอสำหรับซื้อ Pack, อัปเกรดการ์ด (Upgrade), และพัฒนาร่างการ์ด (Evolution) Start Game Screen หน้าจอให้เลือกโหมดการเล่นระหว่าง Normal Mode (Manual) (คลิกโจมตีเอง) และ Auto Mode (ปล่อย AI เล่นจนรู้ผล) Battle Log กล่องข้อความด้านล่างสำหรับการแสดงผลการต่อสู้โดยละเอียด (การโจมตี, ความสามารถ, การใช้สถานะ)

@puk
30 Sep 2025 • 08:19
https://github.com/githubway2us/gamecard

@puk
30 Sep 2025 • 06:17
1️⃣ Restart แบบง่าย docker compose restart botline-app จะหยุดแล้วเริ่ม container ใหม่ทันที โค้ดใหม่ใน volume หรือไฟล์ host จะถูกโหลด 2️⃣ Down + Up docker compose down docker compose up -d เหมือน restart แต่ reset network/container ทุกตัว ใช้ถ้ามีปัญหา network หรือ volume
@puk
30 Sep 2025 • 02:04
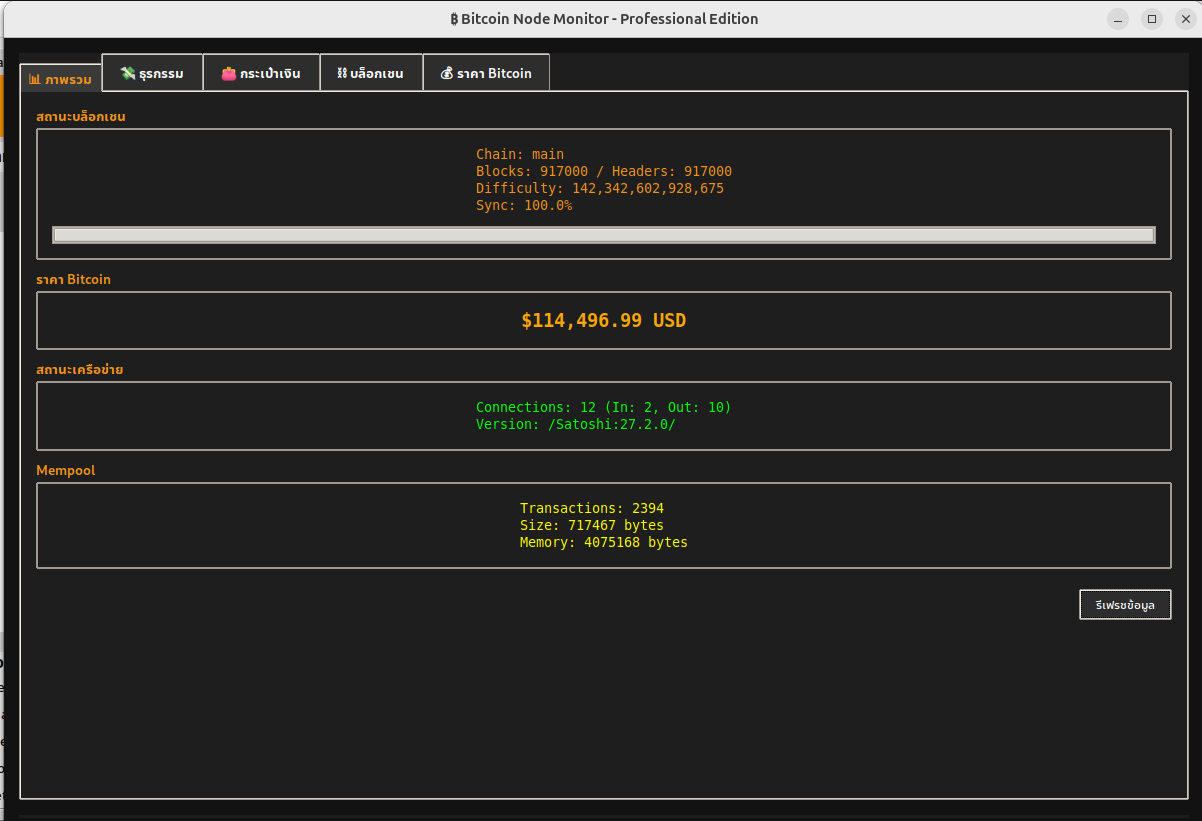
เช็คโหนด
@puk
29 Sep 2025 • 03:41
ตัวอย่างสคริปต์ Python (ลองรันออฟไลน์) บันทึกเป็นไฟล์ xrp_wallet_try_decrypt.py แล้วรัน (แนะนำรันใน virtualenv และติดตั้ง dependency ก่อน pip install pycryptodome) #!/usr/bin/env python3 # xrp_wallet_try_decrypt.py # Requires: pip install pycryptodome import json import base64 import binascii from getpass import getpass from Crypto.Protocol.KDF import PBKDF2 from Crypto.Cipher import AES from Crypto.Hash import SHA256, SHA512 from Crypto.Util.Padding import unpad # helper: try to decode hex or base64 def decode_blob(s): if s is None: return None s = s.strip() # try hex try: return binascii.unhexlify(s) except Exception: pass # try base64 try: return base64.b64decode(s) except Exception: pass # maybe it's raw bytes as-is return s.encode('utf-8') # derive key with PBKDF2 using hash module and iterations def derive_key(password, salt_bytes, dklen=32, iters=10000, hash_name='sha256'): if hash_name == 'sha256': return PBKDF2(password, salt_bytes, dkLen=dklen, count=iters, hmac_hash_module=SHA256) else: return PBKDF2(password, salt_bytes, dkLen=dklen, count=iters, hmac_hash_module=SHA512) # try AES-256-CBC decryption given ciphertext bytes and key def try_aes_cbc_decrypt(key, ciphertext): # require at least 16 bytes IV if len(ciphertext) <= 16: return None iv = ciphertext[:16] ct = ciphertext[16:] try: cipher = AES.new(key, AES.MODE_CBC, iv) pt = cipher.decrypt(ct) # try unpad try: pt2 = unpad(pt, AES.block_size) return pt2 except ValueError: # maybe no padding or wrong key; still return raw decrypted return pt except Exception: return None # heuristic: common iteration counts to try COMMON_ITERS = [1000, 4096, 10000, 16384, 65536] def attempt_decrypt_wallet(json_obj, password): results = [] # Some wallets store salts as hex strings, sometimes two salts (salt1, salt2) # We'll try to derive a key from salt1 (or concatenation) with sha256/sha512 and try AES-CBC candidates = [] # gather candidate encrypted blobs from known fields # look for ppsecret, rpsecret, erk, etc. accounts = json_obj.get('accounts', {}) for acct, data in accounts.items(): for field in ('ppsecret', 'rpsecret', 'secret', 'masterkey', 'ppsalt', 'rpsalt'): if field in data: candidates.append((acct, field, data[field])) # also top-level: rpdata/ppdata erk for top in ('ppdata', 'rpdata'): if top in json_obj: for k, v in json_obj[top].items(): # include salts & hashes too candidates.append((top, k, v)) # try each candidate with salts found nearby # helper to get salt bytes (try salt1, salt2, ppsalt, rpsalt) def find_salts(obj): salts = [] if isinstance(obj, dict): for k in ('salt', 'salt1', 'salt2', 'ppsalt', 'rpsalt'): if k in obj: try: salts.append(decode_blob(obj[k])) except Exception: pass return salts top_salts = find_salts(json_obj) for acct, field, blob in candidates: blob_bytes = None if isinstance(blob, str): blob_bytes = decode_blob(blob) elif isinstance(blob, dict): # if nested dict, skip continue else: continue # collect salts: account-level, top-level acct_obj = json_obj.get('accounts', {}).get(acct, {}) salts = find_salts(acct_obj) + top_salts # if no salt found, try empty salt if not salts: salts = [b''] # try derivation variants for salt_bytes in salts: for hash_name in ('sha256', 'sha512'): for iters in COMMON_ITERS: key = derive_key(password, salt_bytes, dklen=32, iters=iters, hash_name=hash_name) pt = try_aes_cbc_decrypt(key, blob_bytes) if pt: # Heuristic: if plaintext contains ascii-readable words (like "s" secret, "master", "ed25519", or starts with 's' or 32/64 bytes), # record probable success. text = None try: text = pt.decode('utf-8', errors='ignore') except Exception: text = None score = 0 if text: if 's' in text and len(text) >= 15: score += 2 if 'ed25519' in text or 'master' in text or 'secret' in text or 'xprv' in text: score += 3 results.append({ 'account_field': f'{acct}.{field}', 'hash': hash_name, 'iters': iters, 'salt_hex': binascii.hexlify(salt_bytes).decode(), 'plaintext_preview': (text[:400] if text else binascii.hexlify(pt[:64]).decode()), 'raw_plain': pt, 'score': score }) # sort by score (best first) results.sort(key=lambda r: r['score'], reverse=True) return results if __name__ == '__main__': import argparse parser = argparse.ArgumentParser(description='Try to decrypt XRP wallet JSON fields with a password (offline tool).') parser.add_argument('walletfile', help='path to wallet .json (or paste your json string)') args = parser.parse_args() with open(args.walletfile, 'r', encoding='utf-8') as f: j = json.load(f) pwd = getpass('Enter wallet password/PIN to try (input hidden): ') out = attempt_decrypt_wallet(j, pwd) if not out: print('No plausible decryptions found. You can try other iteration counts or KDFs (scrypt) or inspect salts manually.') else: print('Possible decryptions (ordered by heuristic score):\n') for i, r in enumerate(out): print(f'#{i+1} field: {r["account_field"]} hash:{r["hash"]} iter:{r["iters"]} salt(hex):{r["salt_hex"]}') print('preview:', r['plaintext_preview']) print('---') print('\nIf you see a secret-like string (starts with "s" and ~29 chars) that is your XRP secret. Keep it safe!')
@puk
28 Sep 2025 • 02:10
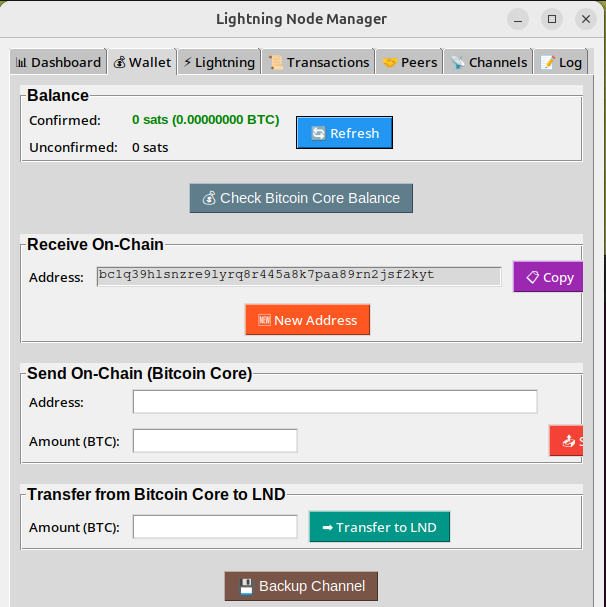
LND :: เช็ค Wallet
@puk
28 Sep 2025 • 01:41
รอพัฒนาต่อ...เร็วๆนี้

@puk
28 Sep 2025 • 01:39
หลังจากที่ HDD พังไป 2 ลูก ตอนนี้ด้ จัดการให้ระบบกลับมาใช้งานได้ปกติแล้ว เหลือรอ LND กลับมาออนไลน์ เพื่อพัฒนาต่อ....
@puk
28 Sep 2025 • 00:44
1️⃣ สร้าง Telegram Bot เปิด Telegram → ค้นหา BotFather พิมพ์ /newbot ตั้งชื่อ bot และ username (username ต้องลงท้ายด้วย bot) BotFather จะให้ API Token → ตัวอย่าง: 123456789:ABCDefGhIJKlmNoPQRsTUVwxyZ บันทึก token ไว้ใช้ในโค้ด 2️⃣ หา Chat ID ของคุณ เปิด Telegram → ค้นหา userinfobot หรือ @get_id_bot กดเริ่ม → bot จะส่งข้อความที่มี chat_id ของคุณ นำ chat_id นี้ไปใส่ในโค้ด 3️⃣ ติดตั้ง Python package สำหรับส่งข้อความ โค้ดของคุณใช้ requests อยู่แล้ว แต่คุณสามารถติดตั้งผ่าน pip: pip install requests requests ใช้ส่ง HTTP POST ไปยัง Telegram API 4️⃣ แก้ไข config ในโค้ด TELEGRAM_BOT_TOKEN = "123456789:ABCDefGhIJKlmNoPQRsTUVwxyZ" # จาก BotFather TELEGRAM_CHAT_ID = "987654321" # chat_id ของคุณ 5️⃣ ทดสอบส่งข้อความ สร้างไฟล์ test_telegram.py: import requests TELEGRAM_BOT_TOKEN = "123456789:ABCDefGhIJKlmNoPQRsTUVwxyZ" TELEGRAM_CHAT_ID = "987654321" message = "Hello from Python! Telegram bot works." url = f"https://api.telegram.org/bot{TELEGRAM_BOT_TOKEN}/sendMessage" data = {"chat_id": TELEGRAM_CHAT_ID, "text": message} r = requests.post(url, data=data) print(r.json()) ถ้า status "ok": True → แสดงว่าพร้อมใช้งาน
@puk
28 Sep 2025 • 00:38
Flatpak: ถ้าใช้ Flatpak อยู่แล้ว สามารถติดตั้งได้: flatpak install flathub org.telegram.desktop